
Content Explorer - metadata view
Content Explorer - metadata view
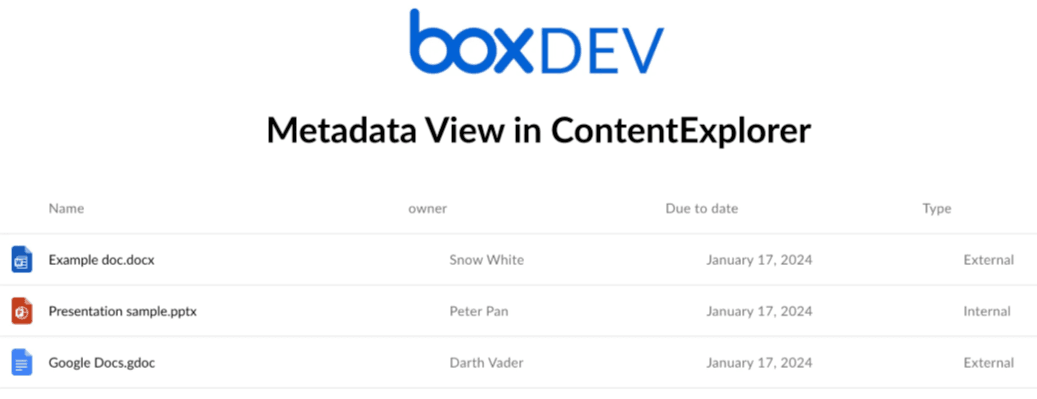
With Content Explorer you can also display files based on their metadata. The metadata view uses metadata template and metadata query to find the data you want to display.
Prerequisites
- Read the Content Explorer guide.
- Check the metadata terminology.
- Check the information on metadata queries.
Create and configure an app
- Create a Box app.
- Add the local development address in the CORS Domains:

- Generate a developer token.

Create a metadata template
The next step is to create a metadata template.
- Use Metadata API or Admin Console to create the template.
- Apply an already created template to a Box folder. Make sure you enable the
cascade policy. For detailed instructions, see instructions on customizing and applying templates.
Display name and key parameters
- The
displayNameparameter is the display name of the template visible
in the Admin Console.
- The
templateKeyparameter is a unique identifier of the template. It needs
to be unique across the enterprise for which you create the metadata template.
If you don't provide the templateKey parameter, API creates a unique one
based on the value in displayName.
- The
[fields].displayNameparameter is the display name of the field as it
is shown to the user in the web and mobile apps.
- The
[fields].keyparameter is a unique identifier for a specific field in
the template. The identifier must be unique within the template to which it belongs.
Display metadata view
Proceed to fill in the necessary properties passed to the Content Explorer. To make things easier, you can use a sample project based on a basic React app to launch metadata view.
- Clone the metadata sample project.
- Update the placeholders in
App.jswith actual values:
| Parameter | Description |
|---|---|
DEVELOPER_TOKEN | Developer token generated in the the Developer Console. |
ENTERPRISE_ID | Enterprise ID copied from the General Settings tab of your Box application. |
METADATA_TEMPLATE_NAME | templateKey of your already created metadata template. Note: To make sure you provided the proper name, use the metadata API to retrieve the name, or copy it from the URL in the Admin Console.

|
METADATA_SOURCE | Source of your metadata. It's a string that combines the scope, enterprise ID, and metadata key. |
ROOTFOLDER_ID | ID of a Box folder to which you want to apply the metadata query and display filtered files. |
The defaultView, fieldsToShow, and metadataQuery parameters are already
defined in the sample project. Examples of these parameters are available in the sample project.
| Parameter | Description |
|---|---|
defaultView | A required prop to paint the metadata view. If it's not provided, you get the regular file view. |
fieldsToShow | Add or hide specific metadata columns to display in the Content Explorer. |
metadataQuery | Provides a way to find files by searching for the metadata attached to them. For additional information on metadata queries, see this guide. |
- Pass the required parameters to the Content Explorer component.
A sample code for a React component including the Content Explorer metadata view would look as follows:
function App() {
    const token = "<DEVELOPER_TOKEN>";
    const rootFolderID = "<ROOTFOLDER_ID>";
    const EID = "<ENTERPRISE_ID>";
    const templateName = "<METADATA_TEMPLATE_NAME>";
    const metadataSource = `enterprise_${EID}.${templateName}`;
    const metadataSourceFieldName = `metadata.${metadataSource}`;
    const metadataQuery = {
    	from: metadataSource,
    	query: "key = :arg1",
    	query_params: { arg1: "value" },
    	ancestor_folder_id: 0,
    	fields: [
        `${metadataSourceFieldName}.name`,
        `${metadataSourceFieldName}.last_contacted_at`,
        `${metadataSourceFieldName}.industry`,
        `${metadataSourceFieldName}.role`,
        ],
    };

    const fieldsToShow = [
    // canEdit propetry determines if the user can edit the metadata directly from Content Explorer component
    { key: `${metadataSourceFieldName}.name`, canEdit: false },
    // displayName alows to change the label on metadata column
    { key: `${metadataSourceFieldName}.industry`, canEdit: false, displayName: "alias" },
    { key: `${metadataSourceFieldName}.last_contacted_at`, canEdit: true },
    { key: `${metadataSourceFieldName}.role`, canEdit: true },
    ];

const defaultView = "metadata";
return (
    <IntlProvider locale="en">
        <div className="App">
            <header className="App-header">
                <h2>Metadata view in Content Explorer</h2>
            </header>
            <section>
                <div className="metadata-based-view">
                    <ContentExplorer
                        rootFolderId={rootFolderID}
                        token={token}
                        metadataQuery={metadataQuery}
                        fieldsToShow={fieldsToShow}
                        defaultView={defaultView}
                    />
                </div>
            </section>
        </div>
    </IntlProvider>
);
}

export default App;
Metadata keys
To decide which fields to show, the Content Explorer uses metadata field keys, not the display names. You can see the display names in the Admin Console and user view, but you can obtain the field keys through the API.
The field keys are not changing, even if you change the metadata display name. This ensures that the functionality works properly, despite any changes to the metadata in UI view.
Metadata keys sanitization
Keys are restricted to alphanumeric characters only:
- No hyphens
-or underscores_are permitted. - Only letters (
a-z, A-Z) and numbers (0-9) are allowed.
Non-Latin characters:
If keys contain characters from non-Latin alphabets (such as Cyrillic, Arabic, Chinese, etc.) they are automatically renamed to generic identifiers:
fieldfor the first occurrencefield1,field2, and so on for subsequent occurrences
Keys are based on the display names.